-
Craft Project Week 9: Marbled Notebooks

-
We’ve recently launched a new Craft Project with Diana Ching who will set a series of creative projects every Thursday on our website and social media to give you ideas of things you can work on at home to build your own piece of art over a period of weeks.
This week’s project is called: Marbled Notebooks.
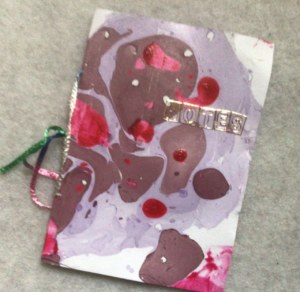
Something a bit different this week… I’ve taken inspiration from one of the lovely crafting ladies who posted a photo of work she had done using the nail polish paper marbling technique for her affirmation cards. It’s so effective that I thought it was worthy of another project. So here’s an idea to make a little notebook that you can use yourself or give to friends.
Marbling can be done in several ways using various materials and the results are always pleasing. For this project, you need is:
- a shallow tray/container (to hold water)
- a few sheets of plain white paper slightly smaller than the size of the tray (smooth watercolour paper is ideal, but it doesn’t have to be heavy)
- three or four colours of nail polish
- a piece of ribbon or thin cord.
It may be best to watch the video below to see exactly how it’s done, but basically – put an inch or so of water in the tray, drop in different colours of nail polish and give it all a quick swirl. Lay a piece of paper into the water and lift it out again straightaway. The result is a beautifully patterned sheet of paper.

Watch the video below (Disclaimer: please note this is third party content, MFT didn’t produce this video):
You can experiment with different colours and combinations of nail polish to get different effects (this may be addictive!). If you don’t have much nail polish or don’t get as much pattern as you’d like, you could add further colour, shapes or doodling when the paper’s dry. (Warning: it does take a while to dry completely – allow several hours or overnight.)
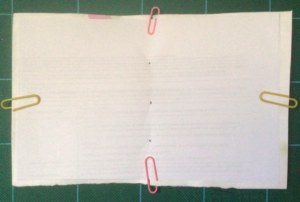
So what to do with the marbled paper? It makes a lovely background for greetings cards or a simple line drawing of something like a flower. Or, to make a notebook: lay your sheet of marbled paper (this is the cover) out flat, measure the dimensions, and cut out a few sheets of blank paper a little smaller all round. Lay these sheets on top of the unmarbled side of the cover, and hold them in place with paperclips.

Fold the stack in half and crease the fold well. Using a skewer or sewing needle, or the point of a small pair of scissors, pierce three equally spaced holes along the fold. Then take your piece of ribbon or cord, and thread it through the holes as follows to “bind” the little book:
1. Starting from the outside, push the ribbon through the centre hole. Leave a tail of a few inches.
2. From the inside, push the ribbon out of the top hole back to the outside
3. Take the ribbon down to the bottom hole and push it to the inside
4. From the inside, through the centre hole to the outside
You should now have the two ends of ribbon at the centre, outside. Tie a knot, and a bow if you like. You could add a bead or two as well.
That’s basically it but you could add some lettering, doodling or drawing on the front cover if you like – the options are endless. It’s a fun little project and you may find yourself making a few as presents!

Don’t forget to share pictures of your creations with us so we can admire them! If you’re happy for MFT to share them on social media too to inspire others to take part, email them to Connie Ridout, Communications Lead at MFT, at connie@maryfrancestrust.org.uk
Thank you!
Diana
Share


