-
Craft Project Week 4: Paint Past The Picture

-
We’ve recently launched a new Craft Project with Diana Ching who will set a series of creative projects every Thursday on our website and social media to give you ideas of things you can work on at home to build your own piece of art over a period of weeks.
This week’s project is another fun one (well I hope they all are!) and again I’ve tried to come up with something versatile so you can interpret it in any way you like depending on what you have to work with. It’s called “Paint Past The Picture” but you can equally use coloured pencils, pastels, paper collage, or fabric and stitch.
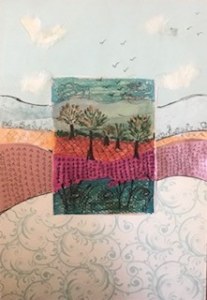
First, find a smallish image of a landscape scene – postcard size is ideal. You may have some holiday postcards that would be great for this, or look in magazines… or draw your own. Any kind of scenery goes, but not too complex. Something like the example I’ve shown below is perfect.

Next get a piece of A4 paper and stick the image roughly in the centre (can be portrait or landscape orientation, depending on your image. My example is portrait). With a pencil, start to extend the horizontal lines of the edges of your picture – basically you’re making the original scene bigger, or “painting past the picture”). Take your lines right up to the edges of the paper. There’s no need for too many lines or too much detail – the effectiveness of this is down to the actual technique, so simple is absolutely fine.
Now you have a piece of paper with your scene in the middle and some lines extending outwards from it, fill in those blank shapes. You can use any kind of colouring material, or paper collage, or a combination. My finished example was worked on a pale blue sheet of paper, so the sky area at the top was already there. I added a largeish piece of patterned scrapbook paper at the bottom, and three other plainer papers for the areas in the middle. So five areas in total. If you don’t have scrapbook or patterned papers that’s fine, you can just colour in the areas and doodle some patterns on them (as I’ve done in my example).

That’s about it really. You can of course add to it to your heart’s content… add some clouds or birds to the sky, perhaps. You’ll end up with a very original piece of work.
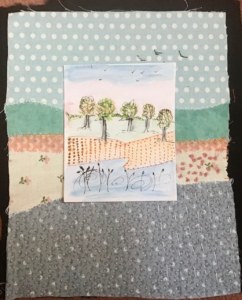
If you like working with fabric and stitch you can achieve the same effect using different fabrics – stitch the fabric shapes together first onto a backing layer (see photo example) and then glue or stitch your postcard on top.

I hope you’ll like this and will have a go!
I look forward to seeing the results on this post – and please also say if you have any thoughts/requests for future projects, this is all about what you’d like to do! You can send photos of your creations to Connie at MFT by emailing connie@maryfrancestrust.org.uk – please mention whether you give MFT permission to share them on social media and whether they can mention your first name or if you prefer to stay anonymous. Thank you!
Diana
Share


